¶ On-board firmware installation
- Select correct SokilLink firmware depending on your device:
- Raspberry Pi 2B / 3A+ / 3B / 3B+ / 4B / Zero 2W (filename: sokillink-onboard-x.x.x-bcm27xx-bcm2709-rpi-2-squashfs-factory.img.gz)
¶ On-board computer setup
- Flash downloaded firmware onto a SD card using balenaEtcher software
- Insert the SD card, turn on your on-board computer and wait some time (few minutes on RPI 1, 30-40s on RPI3)
Once started, computer should be connected to SokilLink Cloud and be aready for binding using LTE modem's IMEI
Please make sure that your SIM card is not protected by PIN number otherwise LTE connection will not be established
¶ Autopilot setup
- Set SERIALx_PROTOCOL (where x is your telemetry number, more details here) to 2 (Mavlink 2)
- Set SERIALx_BAUD to 57 (57600bit/s)
- Set SYSID_MYGCS to 254
¶ GCS setup
- Install SokilGCS from Google Play
- Create an account inside the app or at cloud.sokil.aero
- Confirm your account using the confirmation email
- Press 'Bind' button on the main screen and nter your LTE modem IMEI
Once everything is done, you should see your device in the list with status 'Connected'.
Then you can click 'View' button to navigate to the main control screen. Once you open it, GCS will start to send RC data and you can control it.
¶ GCS channel mappings
Currently channel mappings are hard-coded, customization will be added later
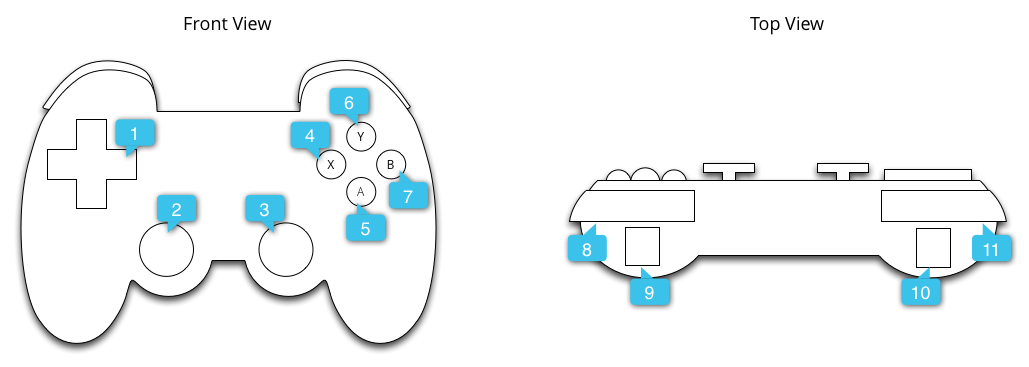
¶ ArduPlane/ArduCopter
- CH1 > Gimbal 3 (X axis)
- CH2 > Gimbal 3 (Y axis)
- CH3 > Gimbal 2 (Y axis)
- CH4 > Gimbal 3 (X axis)
¶ ArduRover
- CH1 > Gimbal 2 (X axis)
- CH2 > Gimbal 3 (X axis)
- CH3 > Trigger 9 sets PWM from 1500 to 1900 (positive/throttle)
- CH3 > Trigger 10 sets PWM from 1500 to 1100 (negative/brake)
- CH6 > Gimbal 2 (Y axis)
- CH9 > Button Mode (not displayed on the drawing)
¶ Common
- CH7 > Button Select (not displayed on the drawing)
- CH8 > Button 4 sets PWM to 1100
- CH8 > Button 6 sets PWM to 1300
- CH8 > Button 5 sets PWM to 1400
- CH8 > Button 7 sets PWM to 1900
- MAVLINK ARM/DISARM > Button Start (not displayed on the drawing)